
This article is part of our How To Use Yanado series
In our 7 Rules For Running Effective Meetings, we tackled the most common issues associated with inefficient meetings, and provided some essential guidelines on increasing meeting productivity.
This is where we go practical. We will show you how you can put these guidelines in use, and how project management tool such as Yanado can help you with running your meetings.
…
Now, there are a variety of tools out there that are specifically made for this purpose. And they all work. Still, choosing one will add one more tool to the list of tools you already are using on your daily work basis. How overburdened with different tools are you already?
Let’s say you decide to use a specific tool to facilitate a meeting. At the end, there will be a bunch of outputs and assigned actions steps to be accounted for.
To keep track of it all, you will probably need to jump back to your project/task management tool, or any kind of team collaboration tool that you are already using.

But, wouldn’t be easier not to have to jump from tool to tool to be able to get the job done? At least, it could be less confusing and waste less time.
So, this is where we suggest you to run and track your meetings within the same tool you already use for organizing and tracking your work.
And, we will show you how you can do this with Yanado.
So, let’s take a step by step.
Step #1 Create The List For Meetings
First, you need a place where you can visualize and track the flow of your meetings, and also make it accessible for everyone on the team.
In Yanado, you do this as you create a separate List and name it “Meetings”.
Use the Invite to put everyone on your team to this List, so they can stay accountable with meetings they attend.
Step #2 Create The Meeting Statuses
To be able to track the flow of your meetings and to keep everyone on the team accountable, you will need to create specific Statuses. These will reflect the state in which your meetings and the work associated with them are.
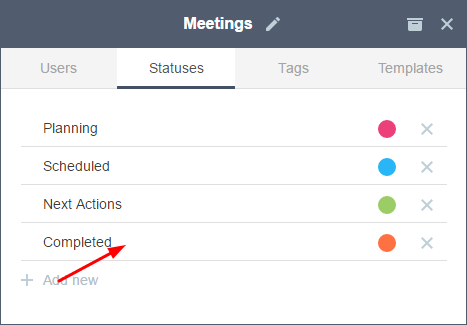
We suggest you create the following Statuses:
- Planning – This is where you will plan all the meetings that are about to be scheduled.
- Scheduled – This is where you will put all the meetings that are planned, have finalized agendas, and are scheduled to happen next.
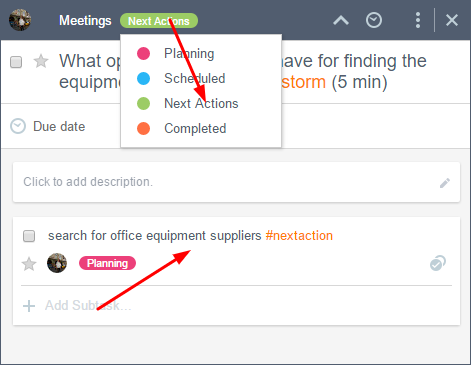
- Next Actions – This is where you will keep all those action steps or tasks that you have agreed upon at the end of each meeting.
- Completed – This status is for all the meetings that have been completed together with the completed action steps associated with them.
Step #3 Planning And Creating The Next Meeting
Statuses: Planning and Scheduled
At this point you will be planning and preparing your next meeting. As already mentioned in our guide for running meetings, you will need to think through the purpose or the objective of your meeting to be able to create the agenda.
In order to create the agenda, consider the following factors:
- Priorities – What are the most important things to be covered?
- Results – What will be accomplished at the meeting?
- Participants – Who needs to attend the meeting for it to be successful?
- Date, Time and Place – When and where will the meeting take place?
You will also take the time to gain inputs from team members/participants in order to add their suggestions to the meeting’s agenda. This will also help you decide on the priorities of the agenda.
To create your next meeting agenda in Yanado, you will go to the Status Column Planning and create a new Task writing the title/question of the meeting.
Meeting title example: Buying new office equipment
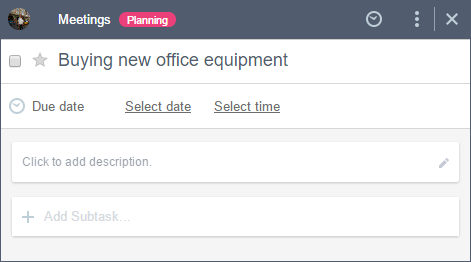
Make sure to provide additional information about the desired outcome/objective of the meeting and specify how long the meeting will last. To do this in Yanado, use Add Description section.
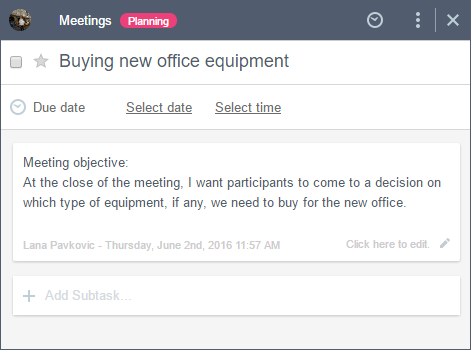
To help determine what your meeting objective is, start with the end in mind:
At the close of the meeting, I want participants to…
Example: Instead of writing: “We will discuss buying new equipment in the meeting”, write “At the close of the meeting, I want participants to come to a decision on which type of equipment, if any, we need to buy for the new office.”
Shifting the paradigm in this way will give more clarity to the desired outcome of the meeting.
If there are any documents or resources you want participants to have before or during a meeting, you can Attach in the Description section as well.
To finish creating the meeting agenda, designate topics you will be covering in the meeting. Consider the order in which will you cover the topics and indicate this in the agenda.
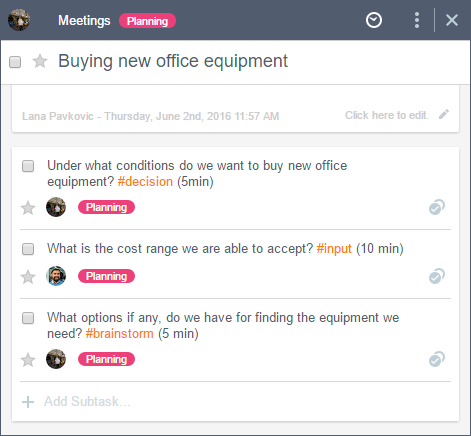
To write the agenda topics in Yanado, use the Subtasks.
The best way to write agenda topics is by writing them in the form of a question because it gives team members the clarity of what needs to be discussed.
Agenda topic examples:
- Under what conditions do we want to buy new office equipment?
- What is the cost range we are able to accept?
- What options if any, do we have for finding the equipment we need?
Make sure you point out the purpose of each topic. Whether that is to share information/ideas, seek inputs or making a decision.
To do that in Yanado, use Tags.
Agenda topic tag example: What is the cost range we are able to accept? #decision
Consider how much time you will spend on each topic.
As you estimate the amount of time (e.g 5 min) for each topic, write it in the topic title.
Example: What is the cost range we are able to accept? #decision (5 min)
You should consider having team members/participants directly responsible for each of the topics in your meeting’s agenda.
To do that in Yanado, Assign that particular Subtask to refer to the particular agenda topic.

Once you have your final meeting agenda set, you can schedule and invite team members/participants who should be present.
You do this in Yanado as you set the Due Date, simply by selecting Date and Time.
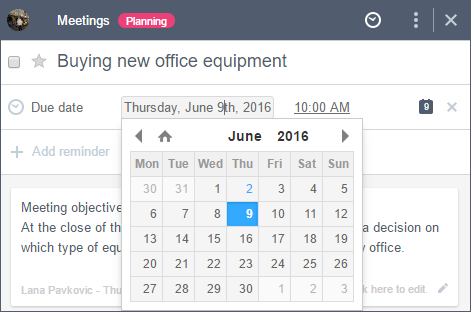
To make sure everyone who needs to be on that meeting is invited,send an invitation with Google Calendar.
NOTE: Once you have scheduled the meeting and sent the invitation to all the participants, make sure you drag this Task/Meeting from the Status Column Planning to the Status Column Scheduled. This is how you make sure everyone on the team can be sure what their next meetings will be and when.
Step #3 Use Yanado To Facilitate The Meeting
Status: Scheduled
The great thing about using a project management tool for running a meeting is that you can track the agenda with ease and add action steps following details directly in the tool.
To be able to facilitate your meeting, make sure you have the agenda in front of you. To do that in Yanado, you simply open the Task/Meeting Title, from the Status Column Scheduled and it shows the meeting details and Subtasks you created as your agenda topics.
As the meeting flows, you will be going through each of the topics you have set, while making sure the discussion around these topics stays within the timeframe and that topics stay focused on the purpose of the meeting.
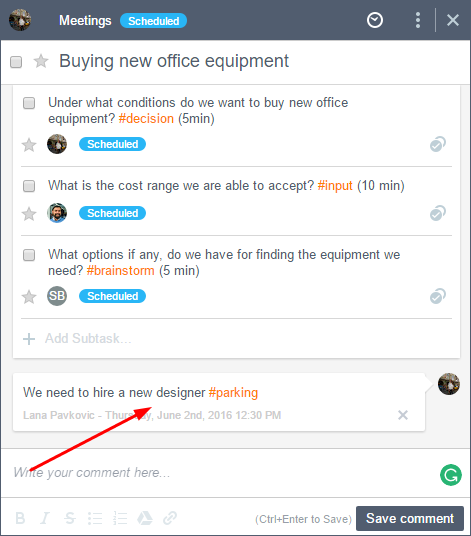
Take note it may occur during the meeting, someone mentions some side topics/ideas/questions/problems that are relevant, but not necessarily related to the current meeting. So what you should do with those?
You should make sure you have a place to write those down, since you will probably address those either during the follow up, or on the next meeting. This place is usually called a Parking Lot.
To have the Parking Lot in Yanado, you can simply use the Comments section inside the Task/Meeting, to write these side topics. You can also add a specific Tag to emphasize them.
Make sure you get back to these Parking Lot items during the follow up and think through how you should tackle them.
Step #4 Planning Next Actions
Status: Next Actions
As the meeting progresses, action items are created. This is the perfect time to delegate tasks and assign responsibility to team members.
To be able to plan these next actions in Yanado you should:
Open the Subtask/Topic associated with them

Change the Subtask/Topic status into Next Actions. Add the next action as an additional Subtask. Also, add a Tag #nextactions to emphasize them
Move this additional Subtask to Another Yanado List associated with the type of the work that needs to be done or associated with the specific company department/team (e.g sales, marketing, L, development…)
Assign this additional Subtask to the person/team member responsible, and make sure you select the Due Date as well.
NOTE: As the meeting is officially over, make sure you drag the whole Task/Meeting into the Status Column Next Actions so that everyone on the Team can see the next actions associated with that Task/Meeting are in progress.
Until those next actions are done, the Task/Meeting will not be considered as completed.
Step #5 Follow Up The Meeting
Status: Completed
During the meeting follow up, keeping track of the next action’s status is critical. Check their status as you open the Task/Meeting and the Subtask/Topic they are associated with in the Status Column Next Action. You will be able to see if these are still open, on hold, in progress or done. These are optional since they depend on the statuses of the List they are in.
Once your team members assigned with Next Actions confirm completion, and once all the Next Actions are completed, you can drag the whole Task/Meeting to the Status Column Completed in your Meetings List.
Conclusion
Yanado can help you power up your meetings, or at least to give them a bit shine.
Hope you like it, and that you’ll give it a try.
It’s always good to get back to some basics. Feel free to gain some essential pieces of advice from our 7 Rules For Running Effective Meetings, every time you need it.